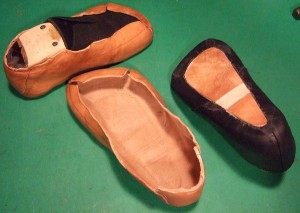
Fitting the foot synopsis

Thanks to a member’s post on Crispin Colloquy, I found “Dress and Care of the Feet” by J.L. Peck at archive.org, a book which I found to be enlightening.

I have very short very wide feet. One foot is a 3½EEEEEE, the other a 4EEEEE. Yup, really. I’m 5’3″ so I’m not short. Okay, I’m not relatively short for a woman. Next to my 6′ spouse, I’m short. And my feet are very thick. All the volume in length I should have for my height is packed into short wide feet. We can do the “woe, genetics” thing another day. I’m just not that into beating my chest over things I can’t change.

With my feet it’s impossible to get shoes that fit the volume of my foot. If the shoe is short enough to fit my length, I can’t get my foot in them. If I can get my feet in them, they’re so long nothing on the footbed fits.

Over the last 8 years I’ve been on a journey to get shoes that actually fit. I’ve gone from shoes made by others (custom made shoes which gave me an ingrown toenail and mildly uncomfortable clogs with a generic footbed that didn’t accommodate the intricacies of the bottom of my foot) to shoes I’ve made.

10th century turn shoes which were too short and exacerbated the ingrown toenail

Pig skin lined wool which were very comfortable if too loose and which still lacked the necessary custom foot bed

The pair of shoes I’m wearing now (kangaroo lining and chrome tanned bison outer) which are ugly but the most comfortable and easily the healthiest shoe I’ve worn yet, though still somewhat lacking in having the footbed just right.

With each iteration of footwear I’ve learned something vital and each subsequent effort is closer to the mark.

So, back to Care and Feeding of the Foot . . . In reading Peck’s “Dress and Care of the Feet” I got confirmation on what I have done. In making the toe box of my shoes overly generous I have been slowly restoring my feet to health. My ingrown toenail no longer bothers me, the large callous at the base of my little toe has peeled off and my ankles are getting healthier and stronger. I no longer lose a day to lameness when I spend a day running around outside.

So, though my shoes are very unfashionable, my feet are happier. With that I interject a hearty and droll “Go me!”

My next effort will be a pair of shoes with the lace encircling the ankle. I’ve made a test shoe and it wraps around my foot properly and provides the right support. I just need to master the footbed. I’ve got plans for that (custom press to shape mold-able cork).

Latest with lace race

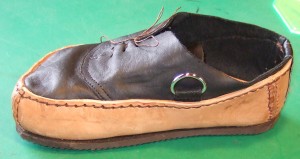
I made two iterations of this shoe, one with the ankle race and one without. The one with the lace race around the ankle was easily the best as it keeps my foot correctly oriented in the shoe.

If you’re wondering about the lacing hardware and direction, my instep is so sensitive I am uncomfortable with laces running across it, even with the extra buffering of a lined tongue. Keeping the laces on the outside of the shoe makes having laced shoes tolerable. By trial and error, I’ve discovered tying the shoe at the bottom provides the most comfort.

The next pair of shoes will have one lace hook paired with lace Ds. I can knot the lace at the bottom and by unhooking the lace off one of the upper hooks I can loosen the laces enough for the shoe to be taken off and put back on.

Second pair of “real” shoes

Lining stretched and drying
Inner tube added after drying to hold lining in place while trimming and gluing
Trimmed, lifted and glued
Glued and set to dry

Rasped and ready for filler

So here’s where I’m at on the second pair of “real” shoes.  These are oil tanned bison outer and vegetable tanned kangaroo lining.

I sewed the upper and lining pieces together then joined them via a row of stitching around the opening.  The rivets I got with the speed lacers where too small so I sent them off to Albert at Sunshine Shoe Repair for rivets to hold on the speed lacers I got at an online shop specializing in fittings for those who build S&M harness and clothing.  <wince>  What can I say, it’s where I found them.

After a good soak, I stretched the lining over the last and nailed it in place.

After it dried I added a ring of inner tube to hold the lining in place while I denailed, trimmed and glued the lining to the insole.

After the glue had dried I trimmed off the excess and rasped the bottom to a fairly regular surface.

Now I need to add the filler, a piece of leather the thickness of the lining leather.  Once the glue holding the filler in place is dry, I’ll build the shapers.  My butt stitching is improving and I hope to have a not too lumpy shaper over which the outer will be stitched down to the midsole.

I’m using 7-cord waxed linen thread for the hand sewing bits.  I’m using nylon upholstery thread for the machine sewn bits.


Outer Shaper

Outer shaper molded and trimmed.
Ready for sole trim and rhino-coating.

I’ve got a pair of shoes in the works.  I don’t know how successful this design will be.  The upper is a single layer of bison and all the support is built into the insole. The single pieced shaper is stitched through the bison layer.

The sole still needs to be trimmed very close to where it joins the upper.  Once the sole is trimmed, I will reinsert the last, get the shaper wet and reshaped.  This will close up the awl holes I made stitching the shaper to the upper.

Once the shaper’s completely dry I’ll paint bed liner over the shaper and the side of the sole.  The end result should be a funky looking sneaker.

There are two things I didn’t do that I probably should have.  I didn’t add a welt around the ankle opening.  That may have been an error and only time will tell.  This is something I can go back and do if I feel I must.

The second maybe oops is, I didn’t stitch the outer sole to the shaper before applying the shaper to the upper.  The one person I know with the machine to do that has developed a really mean case of early onset Alzheimer.  <wince>  Sadly, avoid is the name of the game there.

The side rings are to accommodate a strap that goes around the back of the shoe, through the side rings and across the top of my instep to secure the shoe for heavy duty things like running after horses.  The strap under the foot is, I believe, too long, but I won’t know for sure until I wear the shoes for a while.

Epiphany

I had an epiphany last night.  I need to rethink how I’m making my shoes.  I don’t need to change a lot, but what I need to change will make a significant difference to how my shoes fit and my feet feel.

Because I have a really high arch and correspondingly high instep, I can’t wear a regular shoe and expect it to not hurt my arch.  Any pressure I put on the arch is downward as the lacing tries to press my arch down to fill the void left by the arch of my instep.

I need to do one of two things.  I either need to make an orthotic to fill the void or I need to build the shoe to fill the void.  Of the two choices, I prefer the later.  I hate having to move supports from one shoe to the next.

I’ve started on my first pair of *real* shoes.  I’m going to make a glued “sneaker”.  This will take one additional piece of leather.  I’m going to glue the lining to the insole, add the fill to level off the bottom, add the fill for the instep, glue the upper down over all that, add the fill for the upper, glue on my shaper (yeah, I’m gluing it outside the outer) and then add the final outsole shaping it to come just to the feather edge.  The last bit I’ll have to have Sunshine Shoe Repair do as he has all the wonderful shaping machines.

That should give me an all leather sneaker with superior support.  It should be fun.  Let the games begin . . .

Second pair of fitters

I finished the second pair of fitters this morning and overall, I’m very pleased. They aren’t fashionable, but they do tell me how I’m doing getting my lasts adjusted. I initially thought I would need to narrow the toe box but they’re just right. As to overall fit, the right shoe is perfect. There is nothing I would change about the fit of the right shoe. The left, though close, isn’t quite perfect. My left heel slides up and down just a little and the shoe is a tiny bit short. I occasionally feel the end of the shoe with my left middle toe. Once I fix these two issues, I think I will have great fitting shoes.

I want to add a little to the height of both lasts at the top front of the cone. I think the fit would benefit from having that part of the shoe cut ½” higher.

My next pair of shoes will be a “real” pair with pig skin lining and 4oz outer leather. I’m not saying I won’t wear the fitters. I will. The first pair will work great as house shoes and I’ve already been running around outside in the second pair. They’re not pretty, but otherwise they’re great; light and supportive without being rigid. I’ve added the pair of supports out of my dress clogs to keep my knees and hips comfortable. Picture me happy.

Ultimately, I want to reshape the lasts so the supports can be built right into the shoes. When I get the lasts perfect, I’ll make a mold and recast them in the final shape. That will give me a clean feather edge, something that would make the process of creating shoes on the lasts easier.

Pattern making

Getting ready to draw the pattern

The ;attern cut off the last.

I’ve got my shoe last stuffed into a crappy Hanes NOT 100% cotton sock.  When you wear kid sized socks and you buy a low end brand, don’t expect the content to be consistent from year to year – this purchase was a really unpleasant surprise.  I’m using them up any way I can until all six pair are gone.

With the socked last covered in ~3 layers of painters tape, I’m ready to start drawing lines for the pattern breaks.

Once I cut the pattern off the last (cut right through the sock) I traced the parts onto card board (cereal boxes work great) and added seam allowance where appropriate.

I need to do more to this pattern.  I need to figure out whether I will use a separate tongue or draw a tongue onto the front portion of the pattern.  Decisions, decisions.

I’d like this first pair to be fairly simple.  I’ve got a bunch of fairly thick really good quality leather I might use to make a pair of kickers while I’m waiting for my shoe leather to show up.

Shoe leather

I bought some shoe leather yesterday . . . gray kangaroo.  I’ve had kangaroo leather gloves before (different tanning method for glove leather) and they’re tough.  I also bought a skiving knife that can be sharpened.  I did not want the kind that had replaceable blades.  They may be safer but they’re more costly over the long run and they take more passes to get the job done.

The leather won’t be here for a week.  That gives me time to play with patterns.

Shoe one step one

Shaping the first layer

By now you should know that I don’t do much “normally”.  I research, I see what others have done, I think a lot and I dive in.  Here’s the first splash into serious shoe-making, sink or swim.

I had some cured leather (neither vegetable nor chrome tanned) I’ve cut to act as the form for the bottom of the shoe.  Okay, maybe that’s the wrong way to say it.  The last is actually the form for the shoe, but once the last’s taken out, I want there to be something that stabilizes the shoe lateral, a second stabilizing connection between the sole and the lining/upper.

If you’re wondering why all the cord instead of nice tidy row of finish nails to hold the leather in place . . . I neglected to get the right size finish nails on my last foray to town.  Maybe next time, assuming I remember to put it on the shopping list.  For now, I’ve had to settle for a couple horse shoe nails and bounteous amounts of cord.  On the plus side, that seems to have worked pretty well.  I think I could have done nearly the same thing with a cut up t-shirt in less time, something to try next time.

Sans cording and nails

Here’s what I have (tentatively) decided to try.

The leather you see wrapped around the bottom of the last is being shaped to the last.  Once it has completely dried, I will trim and skive it so the top edge is a uniform height and the thickness graduates to nothing at that level.  Once the trimming and skiving is done, I will set aside these pieces of leather to be added to the assembly later.

Next step is to start normal shoe construction with a leather layer on the bottom of the last that ends at the edge of the bottom.  This layer is skived/rasped at the edge to graduate it to nothing as it comes around the corner from bottom to side of foot.

The upper will be constructed of two layers (outer and lining) with a welt (around ankle and lace opening) and tongue.  The upper is then stretched over the top of last and the lining is pulled down over the bottom of the last where it is stretched, shaped, trimmed and rasped to a harmonious and flat meeting with the initial sole.

At this point I will insert the leather form I created at the beginning, gluing it into position.  As well as stability, this will provide some base line waterproofing.  Toe and heel counters are then added using judicious applications of Barge cement.  Then the sole will be applied to the bottom of the assembly and the upper outer will be pulled down and stitched to the sole.  I’m thinking I’m going to have to have one more layer of leather before the sole is applied.  If I stitch this layer of leather to the previously formed shaper, then apply the shaper to the last, then apply the sole and attach the upper to the sole catching this additional piece of leather, the build will be ultra solid but hopefully not too stiff.  The sole and upper outer will then be trimmed and finished and a sole bed liner will then be added to the inside of the shoe.

I can see a couple problems with this approach but I won’t know how it will wear until I try it.  I am hoping to produce a shoe with a lot of lateral stabilizing support that isn’t too rigid.  I’m a little concerned that I didn’t make the initial shaped leather tall enough at the sides and back.  We’ll have to see how they wear.

So here we go . . . sink or swim.

Two part lasts

While they lack to sophistication of complex break apart lasts, they have all the necessary function.

Lorr’s making more than one set of lasts for me.  This set has been cut into two so they can be removed from boots, which is my first project.

Wadly and I are headed to Lorr’s Saturday.  I’ll get a little more detail on exactly how he did the molding, what product he used for the mold and what he used as a mold release agent.

Cordwaining videos

Andrew Wrigley makes shoes.  He also has a really nice set of videos on YouTube on making shoes.  So far he’s uploaded 5 parts which includes all the clicking (pattern cutting), skiving, dieing, decorating and stitching of the uppers.  He is doing it all using common tools.  The first video is here.

Wrigley’s videos are the first I’ve seen that show how to construct the uppers.

Let them eat cake

Clog upper, prepped sole and appropriate tools.
Bottom of the sole and side of the clog. The back portion of the clog was trimmed to become a strap.

The shoe, all finished. Both were done in under 3 hours.

Marie Antoinette, totally bereft of the concept of people too poor to buy bread, advised the intake of cake instead, totally  missing the point altogether.  Not being able to buy shoes to fit is a bit like that.  I tell people manufacturers don’t make shoes for my size/shape feet and I get a bit of the, “eat cake” thing.

So I had a moment of brilliance this morning.  It happens occasionally.  When it happens Wadly steps back well clear of whatever chaos is about to erupt and watches warily as I forge ahead on some mad scheme.

A couple years ago I had Mark of Multnomah Leather make me a pair of clogs with a radically slanted sole.  It turned out my brilliant idea wasn’t so brilliant but rather than get rid of the whole shoe, I pulled the uppers off (pulled all the brads) and chucked the bottoms.  I’ve played with the uppers a bit trying them on this and that but generally they sat in my shoe materials box unloved and unappreciated.

While waiting for Lorr to cast my lasts I’ve been digging in my shoe materials box.  I had a pair of soles I had prepped with my anti-arch supports and a leather liner.  It occurred to me I could put the clog tops on my prepped soles and I’d have a pair of shoes.  And darned if that didn’t work!

It’s nice to have something comfortable I can wear that doesn’t readily let the water in.  A bit of spit shine and they’ll look pretty spiffy!

Casting for lasts

Box for foot mold

I’ve finally got all my ducks in a row and have cast one of my feet in pursuit of lasts for making my own shoes.

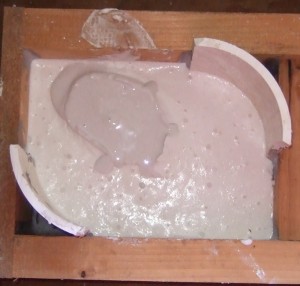
I zipped together a box for the mold, using scrap pieces of 6″ plastic pipe to fill in corners so I don’t waste molding material.  I sealed the seams with some caulk I had on hand (butyl silicone).  I think just about anything would work as a sealer.  One pound of alginate fills the mold to my ankle.  How great is that?!

Foot impression filled with plaster

I taped my anti-arch support in the bottom of the mold before adding the alginate, then stood in the alginate until it set up.  Getting my foot out was pretty easy, just a little wiggling and I was free.

It takes 4 cups of plaster of Paris to fill the mold to the ankle.

The alginate is a nice molding medium.  It’s pretty easy to tear apart to remove the plaster of Paris positive and it faithfully reproduces whatever is molded.

Lorr, cleaning up the positive

I went up to our son’s to get a part for my table saw repaired.  While I was there he cleaned up the positive, a necessary step in getting it ready to mold.

The final shape, just needs a final clean-up and smoothing

And there you have it, a semi-ready form to cast for my left foot last.  I still need to skim-coat it with Bondo before a final sand to make sure it’s smooth, smooth, smooth.  I’ll get the right foot done this week.  Hopefully we can get the lasts cast this coming weekend.

Making shoes will be a good bad-weather project.  I really need shoes that will support my rotten ankle and keep my feet dry while running around outside.

Footie Stuff

Mold just slightly larger than my foot . . . yeah, I know, I have small feet.

I managed to get a mold made of one of my feet.  I used warm water to mix the first batch of alginate and it set up before I could get it out of the bowl and into the mold.  The second time around I mixed using cold water, poured the mix into the mold and stepped into it.  That worked great.

Alginate set up and filled with plaster.

I mixed plaster of paris and filled the mold.  I have to wait until it sets to unmold it.