Revisiting cordwaining

I’m making shoes again.

I bought a pattern and did a test-build. The upside, I learned a lot. I’m totally unsurprised the result doesn’t fit. My feet are pretty abnormal.

It’s important to know what type of foot you have. I have very short feet with very high volume and my foot has a significant curve from heel center to toe center. My foot from heel to end of middle toe is 8.25″ long. My foot is also very wide. 3FF. Until I had custom boots made at White’s I didn’t know there was such a size. Wadly, venerable spouse, says I wear boxes with laces.  Wadly has feet that are the complete opposite. His are very long, very narrow and extremely low volume. He’s living the other end of the “shoes don’t fit” spectrum, he has skis for feet.

The shoe pattern I bought is designed for a more common lower volume straighter foot, something approaching the average foot shape.

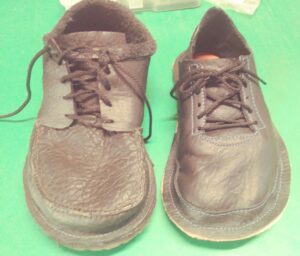
These are from two different pairs of shoes, one I designed that fits and the pattern result. The shoe on the left is what fits me. It is loose enough to accommodate a heavy sock. The shoe on the right is from the pattern. I haven’t added a sole yet because the shoe so low volume I can’t wear it with a sock. I have to take it apart and rework it into something with enough volume to accommodate a sock. (See epiphany at end)

Feet come in four toe shapes; sloped, mountain, plateau and square. This shoe pattern is designed for someone with sloped toes with the big toe being the longest. I have mountain shaped toes with the middle toe being the longest. I had to take some off the big toe and redistribute that volume to the middle toe before ever trying the test shoe. There isn’t quite enough height to comfortably accommodate my fat little piggy toes, something another pattern user commented on.

The second issue is the shape of my foot versus the shape of the footbed. My feet aren’t straight. They curve from heel to toe. If my feet were straight I’d probably wear a women’s 6C or D. The left is a tracing of my foot with room for my toes. This is the shape and size of the foot bed that works for me. The right is my foot bed laid over the pattern sole. Parts of my foot go right over the flange and, at one point, out of the pattern. There’s no way the pattern’s footbed’s shape will ever accommodate my foot.

The poor fit is NOT the fault of the pattern. For most people this would be a lovely pattern with a nice unique heel construction. I know my feet are weird and expected no less than a bad fit when someone else drafts the pattern for the average foot.

The pattern video is here and partners the pattern. It’s worth a watch if you’re at all interested in making your own barefoot shoes. The video sound isn’t the best so be prepared to turn it up.

In writing this I had an epiphany. I spend 99% of my time barefoot. I have fake crocs I use for running to the outside fridge or out to meet delivery drivers when they show up when the weather is wet or cold. I can take these “do not fit”s, fold the heel down and turn them into a replacement without too much effort. If I rip the midsole off and replace it with the shape that fits me I will end up with new slipons that will work for that job handily. A new midsole, a bit of sewing and soling, new elastic laces and I’ll be all set. Win win!


Fighting the good fight

I continually struggle dealing with neck pain. Some days are really bad. Other days are “life is good, smiley face” days. I seem to sway back and forth between the two. I am fighting to increase the things I can do. It’s a daily struggle. I have a bit of a terrier personality and refuse to give in/give up.

One of the activities I miss is cordwaining (shoe making). I see shoes I’d love to wear (bear in mind, I wear a mens 3FF, not a size that is commercially available) and think . . . I could make those! Today, on Pinterest, I ran into these beauties.

I think I’m going to have to try and make them. They are just too fabulous.

My most favorite of brothers introduced me to a Chinese made sewing machine designed to stitch layers of leather. I’m going to have to get myself one of these. I’m viewing it as a must have. It solves a lot of the problems I have with cordwaining. I cannot do the stitching by hand so must have a way to do the stitch that is not by hand.

I have the leather. I have the vision. I must have the way to do the stitching!

Crafting in small spaces

We have a bit of an unusual life, Wadly and I. We live on twelve south-facing acres backed up to forty square miles of Weyerhaeuser on a dead end road off a dead end road mere minutes from the freeway. As locations go, it couldn’t be more perfect. It’s quiet and private here. From the top of our property we can look out over Shoestring Valley and see Mount St. Helens in the distance.

4×6 cutting/crafting table

Once our mortgage was paid off we decided living small was better than bigger fancier accommodations with its accompanying debt. Because our living space is small, engaging in crafts like quilting takes some innovating and good organizational skills. Having a table that will fold up out of the way when not needed is a crafty thing indeed. When it comes to crafting in a small space, it’s all about maximizing use of space!

Unless you have a family whose members require personal space, bedrooms are a waste. They’re one-use rooms not used for most of the day. I’ve always though Murphy beds were a really smart idea. They allow the bedroom to be more than one thing.

Table tilted up out of the way

Our bed is not a Murphy bed. It’s a metal frame that sits up high enough that storage bins can be placed beneath. To further maximize the space, I’ve mounted a 4×6 layout/cutting table on the footboard. The plywood base is covered by an Omnigrid mat I purchased from the factory on a Guild field trip. The mat is held to the table by tiny brass nails to keep it in place when the table is tilted up out of the way.

Silicone molding

The molding clay stop in place with the register dents.
The resulting silicone cast. See where the silicone cast is separating from the last at heel and toe?

I’ve got the first batch of silicone on my last and here are my observations.

First is that I shouldn’t put off until another day the continuation of the project.

Second is that I should put on a lot more silicone in the first coat.  I can work with what I’ve got, I just think it would have been better to keep at it.  When mixed 1:1:1, the combination is spreadable and sets up to the point additional layers could be added in under 2 hours.

Third, I should have used plaster instead of molding clay to build up the ankle and toe of my test last shape.  The silicone and molding clay separate beautifully . . . . but a little too eagerly.  Where the plaster will absorb the water the silicone puts off as it cures, the molding clay cannot and this creates hydraulic pressure which separates the silicone from the clay.  Despite that, I think I can work with this.  It’s just a test and the important bit is neither the top of the ankle OR the toe.  I’ll coat the silicone with a couple layers of mold release and then add the remaining layers of silicone.  I may have to pin the bits that are separating, but I don’t see that as a game changer.

Testing the molding

Materials
Molding clay with silicone mix pasted on.

End result after about 2 hours.

Let the games begin!  I’m testing molding.  After lots of research, I’m actually testing!  Woohoo!

  • Modeling clay (doesn’t dry out)
  • Something to use as a base (glossy scrap cardboard)
  • Pure silicone caulk
  • Xylene
  • Corn starch
  • Stir sticks (old plastic spatulas)
  • Mixing container

I used the modeling clay to make something to mold against.  I cut a piece, stuck it down to the glossy card stock, mixed equal parts corn starch and silicone caulk, then added xylene to get a spreadable consistency.

I then plastered the silicone mix onto the clay.  Not pretty, but pretty really isnt’ necessary.

The third picture is the result after two hours.  The silicone was largely set.  I didn’t do a good enough job getting the silicone into the register holes.  I’ll know to watch for that when starting the actual mold making.

Short casting to last

The plaster wrap from ball to ankle.
Cover with plastic bag and wrap with 4″ wide elastic wrap.
Cut the leather-hard plaster with a serrated butter knife.
Tie a strip of plastic bag around the casting to hold it close while it sets.

Here’s the sequence of producing the short casting. If I don’t have to deal with the toes I can do this by myself pretty easily.  Note that I have coated my foot and ankle with olive oil just after installing the tape (see below).

The only photo I didn’t get was of my foot set with forefoot on the ground and heel off and my leg correctly aligned.

Note the blue painters tape showing above the wrap.  It runs down almost all the way to the bottom edge of the plaster wrap and protects my skin from the butter knife used to cut the plaster wrap.

Positive for last mold

Initial last shape, part plaster cast, part modeling clay.

I’ve used my modeling clay (has oil in it so it doesn’t dry out) and I’ve added to the casting I made for my heel seat press.  There’s no reason I can’t use that casting for both my initial last casting AND as the template for a press for the cork for my heel seat.

Once I get the initial mold made I can clean it up and do any final fussy shaping.  The modeling clay fleshes out the toe and the top of the last at the ankle.

Sequencing

I’ve been toying with making a pair of stitch-down sandal shoes ala Alan James Raddon but I could never figure out how to get the toe strap adjusted so it would be comfortably snug but not too tight.  When I need a solution to a problem, I’ve learned to just let things ferment.  Today I think I’ve found the answer.

Sewing sequence for the toe strap at SixSmith.org

I was researching shoe making stuff and in a search on lasts shoes DIY I ran into a forum that led me to a website that had this picture.  The site is SixSmith.org, a company that makes custom lasts and hold workshops on shoe making.

For making my own pair of sandal shoes, my brain was firmly fastened on sewing the outside first and I couldn’t figure out now to get the strap length right.  Duh.  This is just a little too obvious.  <rolls eyes at self>.  Sew the inside first!

In my weekly conversation with our son, I talked about what I’ve been doing to get lasts that would help me produce a better fitting shoe.  We’ve thrown a lot of ideas back and forth and it’s gelling.  We’ll see how it goes.

Casting for lasts

Instep side

One of the most difficult roadblocks I’ve run into for making my own shoes is good lasts. The better the last matches the foot, the better the fit of the shoe. The better the footbed matches the stabilized foot (vertical support system, forefoot flat on the floor, heel not weight bearing), the less stress put on the leg/ankle.

Because I have both fit issues (3½EEEEEE and 4EEEEE) and support issues (high arch and instep and wrecked left ankle), having a superior fitting last is essential.

Looking down into the heel bed

In the past when I cast my foot I had problems. Part of this is simply learning curve, part of it is technique requiring modification or improvement. When casting your foot in plaster, any movement of the foot changes the final shape of the mold, pushing the mold material and making a loose fitting cast. I’ve wracked my brain on this one and I have the answer to that, finally.  An elastic bandage.

The day before yesterday I cast part of my foot with the intent to build a mold for creating a modified foot bed press for my left foot (bad ankle leg). I bought an Art Minds Plaster Wrap from the craft store and cut half of it into lengths ranging from just over 1′ to just under 1½’.  After collecting all my bits and pieces (plastic to set my foot on while casting, pan of warm water, serrated butter knife, plastic bag, elastic wrap, small bowl with a few tablespoons of olive oil and a 2″ paint brush) together in a convenient spot and protecting the floor, I painted the area of the foot I was casting with olive oil.

I had a reason for not wrapping my foot in plastic before adding the plaster wrap.  No matter what you do, the plastic changes the shape of the foot.  Where there’s only one tiny thin layer it doesn’t make much difference, but every fold and wrinkle adds up to a sloppy fit.  The sloppier the fit the more you have to do to the mold to make it work.  It’s much easier just to paint the foot with olive oil.  Using a paint brush kept it off my hands and gave me a nice thick coat of oil on my foot.

I dipped the pieces of plaster wrap in warm water, squeegeeing off as much of the extra water as I could and proceeded to wrap my foot.

When I finished adding the plaster wrap I covered my foot with a plastic bag and wrapped it with an elastic bandage.  This final bit is the true trick.  It provides tension and keeps the plaster wrap tight against the foot so the end result is a snug fit while the plaster sets.  Before, when casting my foot, I would invariably end up with loose spots in the casting that made the casting less than useful.

With my foot all en-swathed, I sat with a small amount of weight pressing down through my leg into my forefoot with my heel slightly off the ground until the plaster set enough to hold its shape.  I paid particular attention to having my leg properly aligned vertically above my ankle and my ankle flexed to a create a right angle between my foot and my leg.

When the plaster had cured to leather hard, I unwrapped the elastic bandage, removed the plastic wrap and, using a butter knife with a serrated edge, carefully sawed down the front of the casting to almost the edge above the toes.  I pried the edges apart and slid my foot out, wrapping a piece of plastic bag around the casting to close up the front edges before setting it aside to finish curing/drying.

Next time I do this I will be casting the whole foot.  I will fold/roll a piece of plaster wrap lengthwise to create a thicker top edge.  This will help strengthen the casting.  I’ll also get Wadly to help.  This is a much easier job with two people, one to own the foot and hand over the tools and materials, the other to do the wrapping.

Fitting the foot synopsis

Thanks to a member’s post on Crispin Colloquy, I found “Dress and Care of the Feet” by J.L. Peck at archive.org, a book which I found to be enlightening.

I have very short very wide feet. One foot is a 3½EEEEEE, the other a 4EEEEE. Yup, really. I’m 5’3″ so I’m not short. Okay, I’m not relatively short for a woman. Next to my 6′ spouse, I’m short. And my feet are very thick. All the volume in length I should have for my height is packed into short wide feet. We can do the “woe, genetics” thing another day. I’m just not that into beating my chest over things I can’t change.

With my feet it’s impossible to get shoes that fit the volume of my foot. If the shoe is short enough to fit my length, I can’t get my foot in them. If I can get my feet in them, they’re so long nothing on the footbed fits.

Over the last 8 years I’ve been on a journey to get shoes that actually fit. I’ve gone from shoes made by others (custom made shoes which gave me an ingrown toenail and mildly uncomfortable clogs with a generic footbed that didn’t accommodate the intricacies of the bottom of my foot) to shoes I’ve made.

10th century turn shoes which were too short and exacerbated the ingrown toenail

Pig skin lined wool which were very comfortable if too loose and which still lacked the necessary custom foot bed

The pair of shoes I’m wearing now (kangaroo lining and chrome tanned bison outer) which are ugly but the most comfortable and easily the healthiest shoe I’ve worn yet, though still somewhat lacking in having the footbed just right.

With each iteration of footwear I’ve learned something vital and each subsequent effort is closer to the mark.

So, back to Care and Feeding of the Foot . . . In reading Peck’s “Dress and Care of the Feet” I got confirmation on what I have done. In making the toe box of my shoes overly generous I have been slowly restoring my feet to health. My ingrown toenail no longer bothers me, the large callous at the base of my little toe has peeled off and my ankles are getting healthier and stronger. I no longer lose a day to lameness when I spend a day running around outside.

So, though my shoes are very unfashionable, my feet are happier. With that I interject a hearty and droll “Go me!”

My next effort will be a pair of shoes with the lace encircling the ankle. I’ve made a test shoe and it wraps around my foot properly and provides the right support. I just need to master the footbed. I’ve got plans for that (custom press to shape mold-able cork).

Latest with lace race

I made two iterations of this shoe, one with the ankle race and one without. The one with the lace race around the ankle was easily the best as it keeps my foot correctly oriented in the shoe.

If you’re wondering about the lacing hardware and direction, my instep is so sensitive I am uncomfortable with laces running across it, even with the extra buffering of a lined tongue. Keeping the laces on the outside of the shoe makes having laced shoes tolerable. By trial and error, I’ve discovered tying the shoe at the bottom provides the most comfort.

The next pair of shoes will have one lace hook paired with lace Ds. I can knot the lace at the bottom and by unhooking the lace off one of the upper hooks I can loosen the laces enough for the shoe to be taken off and put back on.

The boot option

Trial boot with "lace race"

You really can’t call this a boot.  It’s a shoe but I’ve snugged the top right up against the bottom of my ankle bone to help stabilize my foot.  This design really works.  I run around outside and don’t even notice I have them on.

I’d like to thank Larry Anderson for the “lace race” term.  It’s perfect.

Now that I know this design works I’m going to make a “real” pair.

LOVE toe socks

ToeToe Walkers

I love my new toe socks.  Who knew toe socks could be so awesome?!  They are max comfy if a tad more difficult to install than untoed socks.

I like these so much I’ve ordered smartwool toe socks.  I have some smartwool knee-high regular socks which are the socks I wear most, so smartwool toe socks should be awesome.  Unfortunately, smartwool toed socks don’t come in knee-high style in my size.  I’m getting mini and anklet in womens small.  Better than a jab with a sharp stick . . .

Super awl

Crewel needle chucked into the drill press.

Crewel needle

I have a short hand awl I like to use for opening holes for hand stitching.  It’s got a nice slender shaft and the hole is ample for accepting needles carrying 7-strand waxed linen.  The problem with using it is the amount of time the process takes.  Punch three holes, sew three holes, punch three holes, sew three holes.  The left foot took me two days as my neck would wear out from fighting the awl out of the hole once I managed to get it into the leather to make the hole.

Some really bright guy on the Crispin Colloquy (shoemakers list) used a drill press to punch leather. The drill press wasn’t running, it was used as a press (leverage).  Insert the tool into the chuck (he was using a three gang chisel punch) and pull the lever.  Instant hole. I thought it was such an exceptional idea I just had to try it.

It took less than five minutes to punch all the holes I needed for stitching the shaper to the midsole for the right shoe.  There’s no way I could have done the job that easily or quickly with my hand awl.  I had previously marked all the holes so jumping from one to the next was a breeze.

The crewel needle I used held up really well to being chucked in the press.  I didn’t turn the drill press on to see if I’d managed to chuck it completely straight.  I don’t know how much the difference in symmetry was an issue.  It worked and that’s what I needed to happen.

Second pair of “real” shoes

Lining stretched and drying
Inner tube added after drying to hold lining in place while trimming and gluing
Trimmed, lifted and glued
Glued and set to dry

Rasped and ready for filler

So here’s where I’m at on the second pair of “real” shoes.  These are oil tanned bison outer and vegetable tanned kangaroo lining.

I sewed the upper and lining pieces together then joined them via a row of stitching around the opening.  The rivets I got with the speed lacers where too small so I sent them off to Albert at Sunshine Shoe Repair for rivets to hold on the speed lacers I got at an online shop specializing in fittings for those who build S&M harness and clothing.  <wince>  What can I say, it’s where I found them.

After a good soak, I stretched the lining over the last and nailed it in place.

After it dried I added a ring of inner tube to hold the lining in place while I denailed, trimmed and glued the lining to the insole.

After the glue had dried I trimmed off the excess and rasped the bottom to a fairly regular surface.

Now I need to add the filler, a piece of leather the thickness of the lining leather.  Once the glue holding the filler in place is dry, I’ll build the shapers.  My butt stitching is improving and I hope to have a not too lumpy shaper over which the outer will be stitched down to the midsole.

I’m using 7-cord waxed linen thread for the hand sewing bits.  I’m using nylon upholstery thread for the machine sewn bits.


Outer Shaper

Outer shaper molded and trimmed.
Ready for sole trim and rhino-coating.

I’ve got a pair of shoes in the works.  I don’t know how successful this design will be.  The upper is a single layer of bison and all the support is built into the insole. The single pieced shaper is stitched through the bison layer.

The sole still needs to be trimmed very close to where it joins the upper.  Once the sole is trimmed, I will reinsert the last, get the shaper wet and reshaped.  This will close up the awl holes I made stitching the shaper to the upper.

Once the shaper’s completely dry I’ll paint bed liner over the shaper and the side of the sole.  The end result should be a funky looking sneaker.

There are two things I didn’t do that I probably should have.  I didn’t add a welt around the ankle opening.  That may have been an error and only time will tell.  This is something I can go back and do if I feel I must.

The second maybe oops is, I didn’t stitch the outer sole to the shaper before applying the shaper to the upper.  The one person I know with the machine to do that has developed a really mean case of early onset Alzheimer.  <wince>  Sadly, avoid is the name of the game there.

The side rings are to accommodate a strap that goes around the back of the shoe, through the side rings and across the top of my instep to secure the shoe for heavy duty things like running after horses.  The strap under the foot is, I believe, too long, but I won’t know for sure until I wear the shoes for a while.

Cydwoq (‘sidewalk’)

Cydwoq boots

What would a shoe look like if a California architect designed it?  Trust me, it gets pretty interesting.

Cydwoq produces some pretty interesting uppers and I’ve gotten some really interesting ideas from looking at the footwear on the site.

Sadly, there doesn’t seem to be any awareness of the connection between toe spring (how much the toe of the shoe lifts of the ground) and heel height.  Some of the low heeled or heelless shoes are made on lasts engineered to have more heel than provided on the shoe.

Epiphany

I had an epiphany last night.  I need to rethink how I’m making my shoes.  I don’t need to change a lot, but what I need to change will make a significant difference to how my shoes fit and my feet feel.

Because I have a really high arch and correspondingly high instep, I can’t wear a regular shoe and expect it to not hurt my arch.  Any pressure I put on the arch is downward as the lacing tries to press my arch down to fill the void left by the arch of my instep.

I need to do one of two things.  I either need to make an orthotic to fill the void or I need to build the shoe to fill the void.  Of the two choices, I prefer the later.  I hate having to move supports from one shoe to the next.

I’ve started on my first pair of *real* shoes.  I’m going to make a glued “sneaker”.  This will take one additional piece of leather.  I’m going to glue the lining to the insole, add the fill to level off the bottom, add the fill for the instep, glue the upper down over all that, add the fill for the upper, glue on my shaper (yeah, I’m gluing it outside the outer) and then add the final outsole shaping it to come just to the feather edge.  The last bit I’ll have to have Sunshine Shoe Repair do as he has all the wonderful shaping machines.

That should give me an all leather sneaker with superior support.  It should be fun.  Let the games begin . . .

Second pair of fitters

I finished the second pair of fitters this morning and overall, I’m very pleased. They aren’t fashionable, but they do tell me how I’m doing getting my lasts adjusted. I initially thought I would need to narrow the toe box but they’re just right. As to overall fit, the right shoe is perfect. There is nothing I would change about the fit of the right shoe. The left, though close, isn’t quite perfect. My left heel slides up and down just a little and the shoe is a tiny bit short. I occasionally feel the end of the shoe with my left middle toe. Once I fix these two issues, I think I will have great fitting shoes.

I want to add a little to the height of both lasts at the top front of the cone. I think the fit would benefit from having that part of the shoe cut ½” higher.

My next pair of shoes will be a “real” pair with pig skin lining and 4oz outer leather. I’m not saying I won’t wear the fitters. I will. The first pair will work great as house shoes and I’ve already been running around outside in the second pair. They’re not pretty, but otherwise they’re great; light and supportive without being rigid. I’ve added the pair of supports out of my dress clogs to keep my knees and hips comfortable. Picture me happy.

Ultimately, I want to reshape the lasts so the supports can be built right into the shoes. When I get the lasts perfect, I’ll make a mold and recast them in the final shape. That will give me a clean feather edge, something that would make the process of creating shoes on the lasts easier.

A run at New Balance

I’m always looking for manufactured shoes in my size.  I always seem to miss by half a size.  It’s frustrating.

The latest was a pair of New Balance 3½ XW.  They arrived and the left shoe fit perfectly.  The foot bed was right, the width was right and the length was perfect . . . then the other shoe dropped.  The right shoe fit half a size too small and was tight across the ball.  My left foot is actually half a size larger than my right, so picture me puzzled.  I went online to see if I could get a pair a half size larger but their size 4 doesn’t come in an XW.  <sigh>  At least they cover the cost of shipping the shoes back.

Pattern Updates

Butt stitched shaper

The inside of the butt stitching doesn't look too bad . . .

Here’s the shaper for the left foot showing the butt stitching at the heel.  It’s not the most perfect but it certainly does the job.  I’ve got some more stitching, trimming and skiving to do before I can start assembling the shoe.  The other shaper hasn’t been butt stitched.  I stitched one before shaping it over the last.  The second I left unstitched.  This will tell me which works best, stitching it wet or stitching it dry.