LouAnn called last night. My sunset quilt got People’s Choice at the fair. I don’t know which day it got it but it’s really nice to have it recognized.
Both quilts come home today. <smile>
Knitting, gardening, quilting, cooking and dogs
LouAnn called last night. My sunset quilt got People’s Choice at the fair. I don’t know which day it got it but it’s really nice to have it recognized.
Both quilts come home today. <smile>
LouAnn has been entering her quilting and canning in our local fair for years. I’m fortunate that she drags my quilts along for the ride.
This year I have three quilts entered in the fair. LouAnn called yesterday to tell me they had all received blue ribbons. While that’s nice, it was even more exciting to hear her grape quilt had been considered for the grand poo-bah prize. That’s pretty awesome!
Note: LouAnn called to tell me Sunset on the Farm got People’s Choice at the fair. How nice!
 |
The quilt show is over and two of my quilts did really well.
The Sunset quilt got People’s Choice the second day and second in the pieced category.
The Ichthy Bog Coat got a Vendor’s Choice ribbon and a first in the “Other” category.
Even better, LouAnn’s grape quilt got People’s Choice the very first day! That rocks! And Karen‘s been asked to teach the Square Dance (block used as the border on the bog coat) at two different location! That really rocks!
LouAnn’s Wreath of Life quilt hung in Karen’s booth and many asked for the pattern. We all agree the quilt would have been pretty without the pieced background, but the large Dance block in pastels behind the appliqué really added to the depth and richness of the quilt.
  
|
My three quilts are almost home. They hung at the Pe Ell Quilt Show over the July 4th weekend but they still have two more stops to make before I get to sleep under them.
In two weeks they hang again at the RDQG Quilt Show, then a month later they hang at the SWW Fair.
Confetti Stars got best comfort sized quilt at the Pe Ell show. That’s nice!
LouAnn and I went to the Guild’s Sew Daze yesterday and I got the binding on my sunset quilt. LouAnn’s taken it home with her to stitch down the binding. The quilt is beyond beautiful. The quilting is gorgeous, the colors are gorgeous. I’m going to enjoy sleeping under it.
I’ll get a new picture of it at the next meeting.
I finished the sunset quilt last night. I’ll get a picture of it when it’s quilted and post it. It’s beautiful.

I pulled the sunset quilt off the design wall and have packaged it away with the black wedges, border and backing fabrics. I’m short 4-6 more black fabrics needed to fill in the black section. I’ll have to get by Sisters and pick up the little bits of fabric needed for the last wedges and centers. Until then, I’ve put this project away to work on another quilt I’ve had in the works for a while. I’ll pick it up again in a couple weeks when I’ve collected the last of the fabric I need.

I got the purple stripe added to the quilt. I love the dark purple against the dark green. Lovely.
I picked up the material for the borders and backing. I got a lovely shades of orange and green batik for the back and a great dark green for the border. I wanted a fabric with all colors but Fabric Depot didn’t have anything that would work. The colors were either too bright or too muted or not the right shades or in splotches too big in scale.
I also picked up a gold and a deep red. The gold will be a flange around the center of the quilt, with the red acting as a 5/8″ stopper between the gold flange and the green border.

I finally got the light green section done and the blocks for the dark green section assembled. I’ll get them sewed together and joined to the body of the quilt top next. The dark purple and black sections are still left to do, but I’ve less than a 100 blocks left to sew to be done!
I moved the quilt top up to the ceiling so I could work on the bottom and now the clothes line is visible near the top.
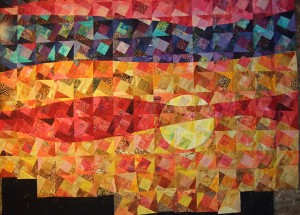
Now that the planting and planning for the new plant wall is winding down I’m getting back to working on my sunset quilt.
When I pull the top off the design wall to sew the rows of orange blocks on I’m going to resew a portion of the sun.
If you click the image to enlarge it you can see there’s a bit too much slack in the lower right quadrant which causes the sun to lose its roundness. That may seem like a nit-picky thing, but that part of the sun doesn’t appear to be behind gauzy clouds. It’s a small detail, but it’s going to drive me nuts if I don’t do something about it.
Having a picture helps me see which blocks need to be swapped or rotated. See the second row from the bottom? The farthest left block and the 3rd from the left have the same material at the top. I need to rotate one of those to break up any impression of a pattern.
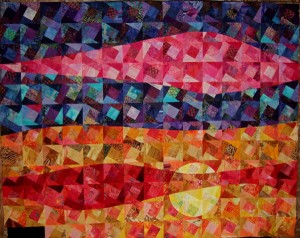
This last week I was having brain issues (2 and 2 is five, right?) and couldn’t program, so I got the extra purple/navy blocks done for the top of the quilt. I also got all the intersections between colors sewn and the sun blocks set into the quilt.
Next is another ~20 orange blocks to complete the orange band under the sun, then I can start on the green, dark navy/dark purple, dark green and black squares.
I talked to Karen (MJK Designs) about using silk organza to produce the evergreen tree shading on the left of the quilt but she says it won’t hold up in a bed quilt. Back to the drawing board. I considered stenciling the shaded evergreen tree overlay but think I’m going to have to spray the shading on and use the gold metallic paint stick to stencil on the suggestion of light at the edges and branch tips. I’ll talk to Marti Carrol when the quilt top ready for this step and see what she thinks.
I was at the Washington Star Quilters Quilt Show on Friday. A vendor there (Eagles Nest Designs) had a lovely pattern called “Dancing Cedars” that might give the perfect shape for the tree silhouette. I’ve got her website bookmarked so I can go back there when I get to that point in the development of the top.
There was another vendor at the quilt show selling hand painted scarves for $1500 each. Definitely outside my price range and not my style, but lovely regardless.
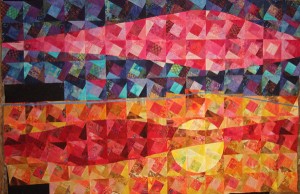
Sadly, I’ve been making progress slowly. It seems that every time I turn around I have something else I have to do. I want to have this done (including quilted and bound) by October so I have to keep pushing.
Yesterday I sewed the pink stripe in and I have the red stripe ready to sew. I want to take a second and share the technique. It’s way faster than hand sewing and as accurate.
Here are the easy steps to this technique.

I’ve got the orange blocks together and up on the wall in roughly the arrangement they belong in. Next step is to sew the blocks together in the correct relationship, then cut and piece the adjoining colors.
LouAnn stopped by last week and got to see the work in progress for the first time. She is loving it, so I know I’m on the right track.
I’ve got two more rows of blue/purple blocks to make one for the very top and one for just above the top orange stripe. Once I get the orange blocks sewn together I’ll get the blue/purple blocks done.
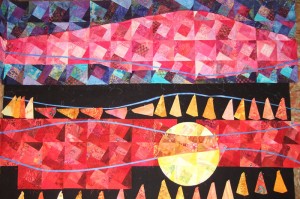
In fitting the dark blue/purple stripe to the pink, I realized I have to have another row at the very top of the quilt for balance. I’ve got more fabric pulled for the squares, I just need to get them cut and assembled.
I’ve got the pink section pinned to the dark blue/purple where it goes. I’m going to try glue basting the match points instead of pinning. I’ll let you know how it goes. I’m after a perfect match so the integrity of the square dance block shape continues throughout.
I took the pink I cut off the top and reconfigured it to extend the bottom of the pink strip. That worked really well. I’m going to do the same with the blue strip below the pink. I may have to add another row of blue squares. I’ll have to see how much I can use of the part I cut off.
I’ve got more orange sorted out but not cut yet. I’ve had little opportunity to work on this in the last couple days. It feels good to be back on it even if I have to do this in bits and drabs.
So I’m putting together the blocks for my sunset quilt, sewing them into strips. As I work I elate. This section is SO pretty! I get a sections done and I say “Oh! This one’s the prettiest yet!”. <sigh> I’m addicted to color.

I’ve gotten more blocks assembled. I have the dark blue blocks for the top done, the blue blocks in the upper middle done and the red blocks around the sun done. I haven’t sewed the blocks together.
I don’t have quite enough pink wedges cut. When I was digging through my scrap boxes for the red to make the cloud layer that covers part of the sun I also pulled pink for the pink sky stripe and purple/eggplant/magenta for the dark purple section below the green. I need to cut wedges from the pink fabrics so I’m sure I have enough.
I’ve got to cut more orange wedges as I have less than ¼ of the number I need. I have 4 or 6 wedges cut from 16 different fabrics. That’s not even 100 wedges. Each orange row is at least 2 blocks high, so 15 (blocks per row) x 2 (rows of blocks per section) x 4 (number of wedges per block) x 2 (number of stripes of orange) = 480 wedges. That’s not counting the center square. I’ll need 60 of those and I’m sure I’ve got maybe 30 of those cut. I’ve got to dig through my scrap box and see how many more orange fabrics I can find. The more variety in shade and texture the better the section will look.
Below the orange will be green. I have a really puny supply of green fabrics. I seem to use those up really fast. I can see this may be a problem. I may have to raid LouAnn’s stash and go shopping. Hmmm.
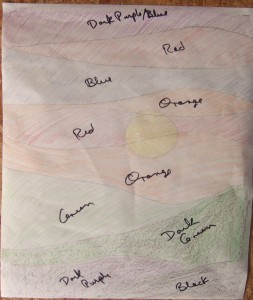
I’m working on a color wash quilt. Don’t gag, it’s not your usual color wash. I’m using my 4″ square dance templates as the building blocks. I’m not making pinwheels, just using the block design as a vehicle for delivering random colors. I think it’s gonna be cool. Given my penchant for bright colors and eclectric design, you know it’s gotta be different.

I started by cutting a bunch of pinwheel wedges and center squares and sewing them together randomly with no two of the same fabric in the same block. Then I started throwing them up on my design wall.
I’m sticking religiously to the square units. Where the color changes I’m cutting the sections along the division lines and matching the block shape where the new color joins. You’ll probably need to click on the image to see what I’m talking about.