I built a aquaponics growbed with a single entry for filling and draining. One of my complaints with many of the aquaponics systems I’ve seen is how much real estate the plumbing takes up. I wanted to cut that down to the bare minimum and I think I’ve accomplished that.

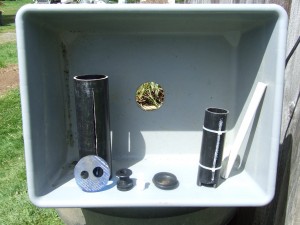
So here’s what I ended up with. The parts you see to the left turn into a single intrusion fill and drain assembly.
Because this growbed is small, I have made a small auto-siphon. Most of what I used was scrap or salvage. The parts I used are:
- a 3/4″ x ~12″ pvc (the skinny white pipe leaning on the right end of the growbed)
- a 2″ x 8.5″ pvc (the short black tube)
- a 4″ x12″ pvc (the big black tube with the vertical slots)
- a cap for 2″ pvc. I can’t tell you where to get what I used. It was on Wad’s bench so I snagged it. It must have come out of something he disassembled. When I do this for my single barrel system I’m going to have to BUY (ack) an endcap and glue it on.
- a 3/4″ bulkhead fitting. This I purchased
- a 3/4″ thread to barb fitting for connecting the pump. This I purchased. Between this and the item above, I think I’ve got less than $7 in the parts. All else is salvage/scrap.
- a 7″ piece of aquarium air hose
- a tube of aquarium sealer (I’ve had this a couple years and still have lots left)
- a scrap of transparent (stiff) plexiglass big enough to cover the 4″ pipe end with 1/8″ extra all the way around. Mine was cut from a garbaged clipboard
Because my growbed tub is HDPE, I was able to cut a hole in it slightly smaller than the 4″ pipe. When I manage to squeeze the 4″ pipe through the hole it’s a really snug fit. The joint leaks a tiny bit, which is good. I’m concerned those drips will eventually be sealed off by debris and I’ll have to drill a drizzle hole somewhere to automatically drain the bed if the power fails when the bed is partially flooded. This growbed sits on top one end of the 100 gallon Rubbermaid water trough fish tank so any leakage ends up in the tank.
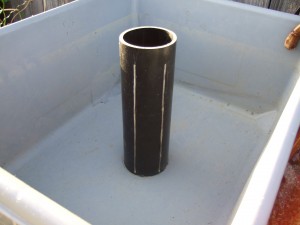
Next I cut 4 slots in the 4″ pipe. I wrapped a 1″ piece of tape around each end of the pipe and cut from the tape at one end to the tape at the other end. That made my slots the same length. If I were doing this again I would drill holes and cut the slots from hole to hole. I would also cut 4 short slots at the bottom end of the pipe. The auto-siphon gurgles 4 times before enough water has drained from the bed to allow the siphon to break. Extra slots just at the bottom would allow the water to drain out of the gravel more quickly and would solve this.

Next I cut a chunk out of the bottom of the 2″ pvc pipe to allow water into the auto-siphon. Then I drilled a hole 1/2″ from the top end of the pipe to accept the aquarium air hose. I sealed the air hose in place with aquarium sealer and fixed it’s vertical position with cable ties. I cut it off a half inch above the slotted opening in the bottom of the pipe.
Then I applied the cap. The thing I’ve got seals airtight and doesn’t need sealer to keep it airtight. I don’t know where it came from (Wad keeps EVERYTHING) but it works great. If I get a pvc cap for the next one, I’ll have to glue it in place. I probably wouldn’t spend the $. I have quite a bit of scrap Plexiglas around. I would cut a circle of something transparent and aquarium sealer it on so I could watch the auto-siphon work.

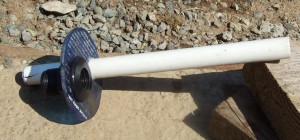
Next I built the round plexiglass base for the 4″ pipe. I cut one hole the size of the bulkhead fitting and one hole the size of the 3/4″ pvc overflow pipe. I screwed the bulkhead fitting on snuggly. Then I stuck the 3/4″ overflow pipe into the overflow cap and marked where the bottom of the auto-siphon cap and the bottom edge of the overflow pipe met. I subtracted 1/4 from the overflow pipe length and made a mark (overflow must have 1/4″ clearance at the top of the auto-siphon cap to allow water to enter the overflow). I sealered the 3/4″ pipe into the plexiglass base beside the bulkhead fitting with the length mark at the top edge of the plexiglass plate.

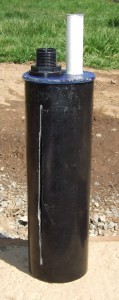
At this point I had to wait to let the sealer set. Once the sealer was set well enough for things to be gently handled I sealed the plexiglass assembly base onto the 4″ tube, then set it aside until the sealer cured.
Now it was time to push the assembly through the hole in the growbed. With the growbed bottom side up I pushed the top of the overflow/auto-siphon assembly through the hole until the full length of the slots were inside the growbed. Then I screwed the 3/4″ threaded-to-barb fitting into the base of the bulkhead fitting, attached the hose from the pump, turned the bed right side up, set it in place and filled it with gravel. The bed is now planted with starts of tomatoes, peppers, lettuce, onions and a single maribold (yeah, yeah, WAY too much stuff for the surface area). One tomato dropped badly when first put in the bed, but by the end of the day it had perked back up and things look great.
Here’s the really interesting bit. I figure if you manage to read all the way through this you deserve a reward. Before the bed was completely filled with gravel the auto-siphon cap floated up as the bed filled. It rose about 2″, maybe a bit more. Then it would sucked down to the bottom when the auto-siphon fully engaged. I left a rock on it at the beginning to keep it in place, but it actually worked better left to do its thing. The sudden suck down gives extra impetus to the siphoning.
I have a plastic cap I set loosely over the top of the 4″ pipe to keep debris out. To lift the auto-siphon cap out I insert a wire with a bit of a hook between the 4″ pipe and the auto-siphon. I snag the edge of the cap with the hook and lift it out. The small difference in size between the outside screening pipe and the inside auto-siphon tube keep the auto-siphon centered in place and reduces the plumbing footprint.
If I have roots grow into the innards I can turn the 4″ pipe and shear them off and clear everything. Because I can lift the 4″ pipe up to increase the water height and push it down through the bottom of the bed to decrease the water height I can adjust the water depth almost an inch (the distance between the bottom of the 4″ pipe and the start of the slots). I can do an emergency drain of the bed by pushing the 4″ pipe down so the slots are exposed on the bottom side of the bed.

This setup works really well and is pretty easy to set up. Other than the two parts I had to purchase, it was pretty much free. I still have lots of scrap and I can raid Thurman’s bone yard if I need more. I think this is the perfect setup for a single barrel system. I have to get Wad’s grow beds going before I can put together the single barrel system, but I’m definately going to use this sytem. The only change I will make beside the extra slots listed above is to put the fill/drain in a corner of the bed so it’s easier to get to for maintenance.

Not Very Usefulllllllllllllllll !
What’s not very useful? It worked perfectly for two seasons before I moved up to bigger beds. I’ve still got it in the loft and will pull it out and use it in the sun porch next summer.
This article doesn’t really show how it works. I am unclear on how the water gets into the large black tube when it drains and how it comes out when it is pumped up.
This doesn’t look like any autosiphon I’ve ever seen.
A diagram of how the water moves through it would be very helpful.
Check out some of the auto-siphoning videos on Youtube. This one is particularly useful .